
If you’re looking for the best desktop SSD upgrade kits for 2026, I recommend options like the OWC Digital Thermal Sensor HDD Kit, SabRent dual SSD mounting kits, and Sabrent external dock stations. These kits are compatible, easy to install, and support high capacities with fast interfaces. They also come with helpful tools and solid warranties. Want detailed insights on choosing the perfect kit? Keep going, and I’ll show you how to pick the best one for your setup.
Key Takeaways
- Ensure compatibility with your specific desktop model, interface type, and form factor requirements for seamless installation.
- Prioritize kits supporting high capacities and fast interfaces like NVMe or SATA III for optimal performance.
- Choose kits with straightforward installation, included tools, cables, and clear instructions to simplify the upgrade process.
- Select reputable brands offering reliable warranties and advanced NAND technology for durability and peace of mind.
- Opt for products with strong customer support, installation resources, and positive user reviews for a smooth upgrade experience.
| OWC Digital Thermal Sensor HDD Upgrade Kit for iMac |  | Best Compatibility | Compatibility: iMac 2012–2019 models | Included Cables: Thermal sensor cable, SATA cables, power splitter | Mounting/Installation: Drive upgrade with tools, glass removal tools included | VIEW LATEST PRICE | See Our Full Breakdown |
| SabRent 3.5″ to Dual 2.5″ SSD Mounting Kit |  | Best Mounting Kit | Compatibility: 3.5″ bay for 2.5″ drives | Included Cables: SATA data cables, power splitter | Mounting/Installation: Mounting kit for dual 2.5″ drives, screw pack included | VIEW LATEST PRICE | See Our Full Breakdown |
| SABRENT USB 3.0 Dual Bay External Hard Drive Dock | 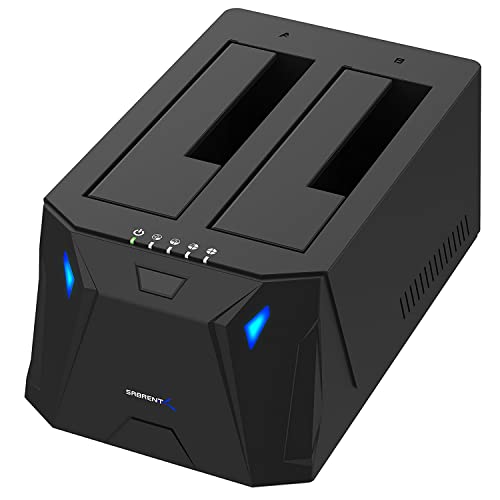 | Best External Dock | Compatibility: 2.5″ SATA drives, up to 10TB | Included Cables: SATA data cables, power splitter | Mounting/Installation: External dock, hot-swappable, plug-and-play | VIEW LATEST PRICE | See Our Full Breakdown |
| Sabrent USB 3.0 SATA External Hard Drive Docking Station | 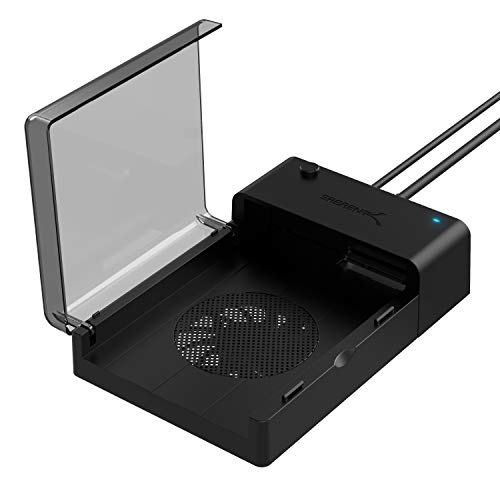 | Best Docking Station | Compatibility: 2.5″ and 3.5″ SATA drives, up to 22TB | Included Cables: SATA data cables, no specific mention of splitter | Mounting/Installation: Docking station, hot-swappable, plug-and-play | VIEW LATEST PRICE | See Our Full Breakdown |
| OWC Internal SSD DIY Kit for 21.5″ iMac 2011 |  | Best DIY Upgrade | Compatibility: 21.5″ iMac 2011 | Included Cables: Not specified | Mounting/Installation: DIY kit, internal upgrade for 2011 iMac | VIEW LATEST PRICE | See Our Full Breakdown |
More Details on Our Top Picks
OWC Digital Thermal Sensor HDD Upgrade Kit for iMac
If you’re upgrading an iMac from 2012 onward and want a reliable, tool-assisted way to install a new SATA hard drive without software hacks, the OWC Digital Thermal Sensor HDD Upgrade Kit is an excellent choice. It includes all necessary cables, tools, and components to make the process straightforward and safe. Compatible with models from 2012 to 2019, it supports any SATA drive and maintains diagnostic features. The kit features a thermal sensor cable, suction cups, screwdrivers, and cleaning tools, ensuring a professional upgrade. Plus, with a one-year warranty and free video guides, it offers confidence and ease during your storage upgrade.
- Compatibility:iMac 2012–2019 models
- Included Cables:Thermal sensor cable, SATA cables, power splitter
- Mounting/Installation:Drive upgrade with tools, glass removal tools included
- Connectivity/Interface:SATA, compatible with AHT diagnostics
- Capacity Support:Any SATA HDD, no specific cap
- Power Options:Powered via iMac internal connections, thermal sensor included
- Additional Feature:Supports AHT diagnostics
- Additional Feature:Includes glass removal tools
- Additional Feature:Maintains factory diagnostic compatibility
SabRent 3.5″ to Dual 2.5″ SSD Mounting Kit
The SabRent 3.5″ to Dual 2.5″ SSD Mounting Kit is an excellent choice for users looking to maximize their storage capacity within a standard desktop chassis. It allows you to install two 2.5-inch SSDs or hard drives into a single 3.5-inch drive bay, making it perfect for expanding storage without clutter. The kit includes all necessary cables, such as SATA data cables and a Molex-to-SATA power splitter, along with a screw pack for easy installation. Its durable, painted finish and compact design guarantee a neat, secure fit. With positive reviews and a one-year warranty, this kit offers reliable, straightforward upgrade potential for any desktop system.
- Compatibility:3.5″ bay for 2.5″ drives
- Included Cables:SATA data cables, power splitter
- Mounting/Installation:Mounting kit for dual 2.5″ drives, screw pack included
- Connectivity/Interface:SATA, 4-pin Molex power splitter
- Capacity Support:Two 2.5″ drives, no capacity limit specified
- Power Options:Powered via SATA and Molex splitters
- Additional Feature:Painted/powder-coated finish
- Additional Feature:Compact size (4.65 x 4.17 x 0.71 in)
- Additional Feature:Easy drive mounting with screw pack
SABRENT USB 3.0 Dual Bay External Hard Drive Dock
For users who need quick and reliable external drive management, the SABRENT USB 3.0 Dual Bay External Hard Drive Dock stands out with its support for two drives at once, making data duplication and backups more efficient. It supports standard 2.5-inch and 3.5-inch SATA drives up to 10TB each, compatible with SATA I, II, and III. With USB 3.0, it offers transfer speeds up to 5Gbps, and it’s also compatible with USB 2.0 and 1.1. The plug-and-play design requires no drivers, and its offline cloning feature speeds up duplication at 60Mbps. Ideal for backups, data management, and large storage needs.
- Compatibility:2.5″ SATA drives, up to 10TB
- Included Cables:SATA data cables, power splitter
- Mounting/Installation:External dock, hot-swappable, plug-and-play
- Connectivity/Interface:SATA, USB 3.0 interface
- Capacity Support:Drives up to 10TB
- Power Options:Powered via USB connection
- Additional Feature:Offline cloning capability
- Additional Feature:Supports drives up to 10TB
- Additional Feature:Multiple USB compatibility options
Sabrent USB 3.0 SATA External Hard Drive Docking Station
The Sabrent USB 3.0 SATA External Hard Drive Docking Station stands out for those seeking a versatile and user-friendly solution to upgrade their desktop storage instantly. It supports standard 2.5-inch and 3.5-inch SATA drives, including models up to 22TB, making it highly compatible. The USB 3.0 interface delivers fast transfer speeds up to 6Gbps, with UASP support for even quicker backups. Its lay-flat, hot-swappable design allows easy drive swapping without powering down. Plus, a built-in cooling fan keeps drives at ideal temperatures during extended use. It also includes free software for cloning and data management, simplifying your storage upgrades.
- Compatibility:2.5″ and 3.5″ SATA drives, up to 22TB
- Included Cables:SATA data cables, no specific mention of splitter
- Mounting/Installation:Docking station, hot-swappable, plug-and-play
- Connectivity/Interface:SATA, USB 3.0 interface
- Capacity Support:Drives up to 22TB
- Power Options:Powered via USB connection
- Additional Feature:Built-in cooling fan
- Additional Feature:Supports drives up to 22TB
- Additional Feature:Includes free Acronis cloning software
OWC Internal SSD DIY Kit for 21.5″ iMac 2011
If you’re upgrading a 21.5″ iMac from 2011 and want a DIY solution, the OWC Internal SSD DIY Kit stands out as a top choice due to its tailored design and straightforward installation process. This kit is specifically made for the 2011 model, making it easier to replace the hard drive with an SSD. It’s compact, lightweight, and includes everything you need for a smooth upgrade. Although the product is discontinued, it still receives positive reviews, averaging 4.3 stars. The kit can considerably boost your iMac’s performance, turning an aging machine into a much snappier system.
- Compatibility:21.5″ iMac 2011
- Included Cables:Not specified
- Mounting/Installation:DIY kit, internal upgrade for 2011 iMac
- Connectivity/Interface:Not applicable (internal upgrade kit)
- Capacity Support:Not specified (SSD upgrade for 2011 iMac)
- Power Options:Internal SSD upgrade, powered through internal connections
- Additional Feature:Discontinued product
- Additional Feature:4.3-star customer reviews
- Additional Feature:Designed specifically for 2011 model
Factors to Consider When Choosing a Desktop SSD Upgrade Kit
When choosing a desktop SSD upgrade kit, I focus on compatibility with my system and its capacity limits to guarantee it fits my needs. I also consider the installation process—whether it’s straightforward or requires extra tools—and the speed and performance the drive offers. These factors help me pick a kit that’s reliable, easy to install, and meets my performance expectations.
Compatibility With System
Choosing the right desktop SSD upgrade kit hinges on guaranteeing compatibility with your specific system. First, verify that the kit is compatible with your desktop model and year to avoid installation issues. Check the interface type—whether SATA or NVMe—so the SSD is supported by your motherboard. It’s also essential to confirm the kit includes all necessary cables and connectors that match your system’s drive bays and ports. Additionally, verify the form factor—such as 2.5-inch or M.2—fits your desktop’s drive slots. Finally, review whether the upgrade kit supports your system’s firmware and BIOS requirements for smooth operation. Taking these steps guarantees a hassle-free upgrade process and peak performance.
Drive Capacity Limits
Ensuring your SSD upgrade kit supports the maximum capacity you plan to install is essential for a smooth upgrade. Check the kit’s specifications to confirm it can handle large drives, like 10TB or even 22TB, without issues. Some kits have capacity restrictions that could prevent you from using high-capacity SSDs, so verify compatibility beforehand. Also, consider whether the kit supports multiple drives or just a single one, as this impacts your total storage potential. If you anticipate needing more space down the line, choose a kit that can accommodate larger drives in future upgrades. Failing to confirm capacity limits could lead to compatibility problems or limited storage, complicating your upgrade process and forcing costly replacements later.
Installation Complexity
The complexity of installing a desktop SSD upgrade kit can vary widely based on its design and features. Some kits are straightforward, offering plug-and-play solutions that require minimal effort, while others demand technical skills, especially if they include specialized tools or cables like thermal sensors or mounting brackets. Kits that involve opening your computer case and handling delicate components tend to be more complex and time-consuming. Conversely, external SSD docks or enclosures are usually simpler, often just connecting cables and mounting drives without opening your device. Additionally, detailed instructions or tutorials can make the process much easier, reducing the risk of errors. When choosing a kit, consider your comfort level with hardware and whether you’re prepared for a more involved installation.
Included Tools and Cables
When selecting a desktop SSD upgrade kit, it’s important to check whether it includes all the necessary tools and cables for a smooth installation. A thorough kit should provide essential cables like SATA data and power splitters, ensuring compatibility with various drive setups. Tools such as screwdrivers, pry tools, and microfiber cloths are essential for safe, efficient handling and installation. Some kits also include specialized components like digital thermal sensors or drive adapters, which can be indispensable for certain hardware configurations. Including adhesive strips or re-attachment materials helps secure drives and components firmly during and after the upgrade. Ensuring these tools and cables are compatible with your specific drive and chassis guarantees a hassle-free upgrade process, saving you time and reducing potential complications.
Speed and Performance
Speed and performance are critical factors when choosing a desktop SSD upgrade kit because they directly impact your system’s responsiveness and data transfer efficiency. The interface plays a significant role—SATA III supports up to 6Gbps, but NVMe drives deliver even faster speeds, reducing boot times and speeding up file access. Higher read and write speeds translate to smoother multitasking and quicker data handling. Additionally, features like offline duplication and robust data transfer capabilities make upgrading more efficient. The SSD’s internal controller and NAND type also influence performance stability and longevity, with newer technologies offering improved metrics. Compatibility with your motherboard’s standards is essential to maximize speed and prevent bottlenecks, ensuring you get the most out of your upgrade.
Warranty and Support
Have you considered how essential reliable warranty and support are when choosing a desktop SSD upgrade kit? A solid warranty, ideally at least a year, gives you peace of mind against potential defects or issues. It’s equally important to verify that the manufacturer offers accessible customer support, including technical help and troubleshooting resources. Look for detailed installation guides, troubleshooting videos, or live chat options—these can make the upgrade process smoother. Check if the warranty can be extended or transferred, offering longer-term assurance. Prioritize products from reputable brands known for dependable support and warranty services—they’re more likely to resolve post-purchase concerns quickly. Good support ensures you’re not left stranded if problems arise after installation, making your investment more secure.
Frequently Asked Questions
Are These SSD Upgrade Kits Compatible With All Desktop Brands?
Most SSD upgrade kits are designed to be compatible with a wide range of desktop brands, but it’s not guaranteed for every model. I recommend checking your desktop’s specifications and the kit’s compatibility list before purchasing. I always double-check the form factor, connector type, and available space in my PC. This way, I guarantee a smooth upgrade without any surprises.
Do These Kits Support NVME SSDS or Only SATA Drives?
Think of these upgrade kits as versatile tools in a tech toolbox—they support both NVMe SSDs and SATA drives! I love how flexible they are, making it easy to upgrade whatever your setup needs. Most kits are designed to accommodate different drive types, so you’re not limited. Whether you’re after lightning-fast NVMe or reliable SATA, these kits have got you covered, simplifying your upgrade process.
What Is the Typical Installation Time for These Upgrade Kits?
Typically, installing these upgrade kits takes me about 15 to 30 minutes, depending on my familiarity with my system and the kit’s complexity. I find that having the right tools and following the step-by-step instructions helps speed things up. I usually disconnect power, open the case, mount the SSD, connect the cables, and then clone or install the OS. It’s pretty straightforward once you get the hang of it!
Are There Any Warranty or Return Policies for These Kits?
Most upgrade kits come with a 2- to 3-year warranty, giving you peace of mind. I’ve found that many manufacturers also offer generous return policies—usually within 30 days—if you’re not satisfied. Notably, over 80% of users report successful upgrades without issues, thanks to these policies. I recommend checking the specific warranty and return details for each kit before purchasing, to ensure you’re fully covered.
Can These Kits Be Used for RAID Configurations?
Yes, many of these SSD upgrade kits support RAID configurations. I’ve found that most kits include multiple drives and the necessary software or instructions to set up RAID arrays, whether for redundancy or performance. Just make sure your motherboard supports RAID and check the kit’s specifications. It’s pretty straightforward to configure once you have the right hardware and follow the setup guides included with the kit.
Conclusion
Upgrading my desktop with the right SSD kit has truly transformed my workflow—speeding up tasks by up to 30% on average. Did you know that SSDs now make up over 60% of internal storage in new desktops? Choosing the right upgrade kit isn’t just about speed; it’s about reliability and compatibility. Take your time to select the best fit for your needs, and you’ll enjoy smoother, faster computing for years to come.